Tuesday, May 31, 2022

Super Cute and Easy Pincushion

 This cute little pincushion works up quick, using materials you probably have around the house, and is cute and useful as well. These make a perfect little gift for anyone who sews, or just to keep for yourself :)

What you'll need:

- Some sort of ruler or tape measure
- Scissors
- Pencil or pen
- Paper towel tube and a small piece of thin flat cardboard (like from a cereal box)
- Needle and thread
- One or two small pieces of fabric (pictured is a scrap of cotton print and salvaged old hand towel)
- Small handful of stuffing (you could also use shredded fabric or yarn)
- Washers to use as weights (these are optional, but make the pincushion a little more stable)

Step 1: Prepping the cardboard
Cut the paper towel tube to the height you want your pincushion to be. I used 1 1/2"


Use the paper towel tube to trace two circles onto the flat cardboard

Trace the outside of the tube for one circle, and the inside of the tube for the other. Cut out both circles.

Step 2: Covering the tube
Choose what part of the fabric you want to use and lay the tube on it. Make a mark on both the tube and the fabric.

Carefully roll the tube along the fabric one full turn. Use the mark in the tube to make a second mark on the fabric.

Measure and mark the fabric 1/2" longer than the two marks you just made and 1/2" wider than the length of your tube (so for a 1 1/2" tube the fabric will be 2" wide.) Cut out this rectangle and sew the short ends together with 1/4" seam allowance.

Slide the fabric around your tube. With a long piece of thread, take the needle up through the top edge of the fabric from the inside.

Then take the needle down through the bottom edge. Continue alternating between the edges in a zig-zag, working your way around the tube.

Once you've laced all around, the fabric should be held snugly to the tube and the two edges folded in.

Step 3: Making the cushion top
Lay your cardboard circles on the second fabric. Trace a circle 1/4" bigger than the bigger circle, and one 1/2" bigger than the smaller circle.

Cut out both fabric circles.

Sew a running stitch around the edge of the larger fabric circle.

Pull the thread to cinch up the circle a little. Stuff in the stuffing and place the smaller cardboard circle on top.

Cinch the thread until the edges of the cardboard are covered. Stich a few times across the cardboard circle to hold it all snugly in place.

Set the cardboard circle just inside the top edge of your tube. Sew around the top edge of the tube, securing the cushion in place.

Step 4: Making the bottom
Similarly to the tube, lace the remaining fabric circle around the bigger cardboard circle so all the edges fold over.

If you want to add a little weight to the bottom of your pincushion for stability, slide a couple metal washers under the lacing stitches.

Set the covered circle onto the bottom end of the tube and sew around just like for the cushion top. Make sure all the fabric edges get tucked in.

Step 5: That's it, stick a pin in it and enjoy!


Monday, May 23, 2022

Vintage Craft Book Feature: More Knitting in Vogue (1983)

Another of my many needlework hobbies is the collection of vintage craft books. Found in dusty corners of second hand shops, in pride of place in used book stores, these old tomes often contain beautiful nuggets of crafting wisdom, and a heaping helping of vintage charm. Reviving the techniques, tips and retro projects is just one more way for us to bring back the wonders of the handmade.


More Knitting in Vogue 1983


The sequel to the fabulous Knitting in Vogue from 1981, this book has even more cool vintage patterns adapted for 1980's crafters. 


It even has patterns for men' sweaters, though most of them are very boring compared to the offerings for the ladies.


As is the previous book, each pattern is accompanied by a picture from the original.


Many of these older images are way more fun than their newer counterparts.


This leaf patterned cardigan is one of my favorites from the book. It's such a cool design that it even looks nice over the graph paper blouse.


On the more technical side, there's actually a really nice instructional segment at the end of the book. There are tips and diagrams for how to make buttonholes and sew seams and other finishing techniques. And also this super handy guide for what all those little symbols on yarn labels mean. All in all it's a great book and well worth the place on the shelf!

Friday, May 20, 2022

Luxury Lace Indeed

It's Free Pattern Friday! 

This time I have a knitting pattern for you, designed by yours truly!

My local yarn shop has a clearance bin where all the single skeins of discontinued yarns end up. I found two hanks of Neighborhood Fiber Co. Capital Luxury Lace in that bin. Luxury is the word for this yarn for sure. It's a blend of merino wool, cashmere, and silk. It's deliciously soft and warm and dyed in beautiful rich colors.

Having only two not matching hanks, I had to get creative with what I made from it. I've always loved the look of bright fabrics peeking through an over layer of lace, so I took that idea and ran with it.

You can find the full downloadable pdf pattern here: 

https://www.ravelry.com/patterns/library/elderwood


Thursday, May 12, 2022

Inspried by Awesome

 If you've never heard of him, Erte was a 20th-century artist and designer in an array of fields, including fashionjewellerygraphic artscostume and set design for film, theatre, and opera, and interior decor

I absolutely love his elegant models swathed in drapey fabrics, and his illustrations have inspired a lot of my designs. Here are a couple more of my favorites, inspired by the awesome of Erte:


This fanciful Venus-like image tickled my imagination for a long time before I found the right pieces to put together to bring it to life.


The original striking black was replaced by mermaid colors of turquoise and purple, though I kept the side lacing and tasseled ties. This sassy tunic is one of my favorites, and was a lot of fun to put together.


The dress in the drawing looks like just swatches of silky cloth draped and tied with beads and braids. Completely impractical, and also completely wonderful.


I didn't completely abandon practicality in my recreation, adding a sturdy beaded halter style neck and sewn in slip, but this is still a pretty frivolous dress. I still love that draped fabric look, though!


This drawing isn't Erte's work, clearly. It's an old ad for petticoats, reproduced in another of my vintage craft book collection. The swirl of the ruffly skirt spoke to me in the same way though, and I knew I had to make a fabulous petti-skirt.


A trove of Dutch lace curtains at my local thrift store gave me the perfect material for my layered skirt. Big and ruffly and swishy, this skirt is a dream to twirl in.

Wednesday, May 4, 2022

May the Fourth Be With You!

Yes, I am a huge nerd. But I'm not the only one! Enjoy these super nerdy thrift store finds in honor of Star Wars Day!


First an R2-D2 thermos, now a lightsaber. One could make a whole set of super nerdy beverage containers, and it would be awesome! Almost makes me wish I were a coffee drinker...

My husband loves waffles almost as much as he loves the Millennium Falcon, he was very excited by this find!


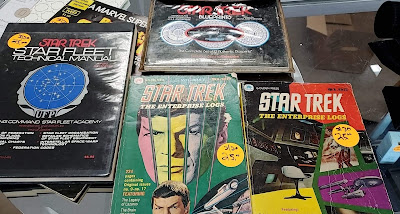
I know, this one isn't Star Wars. But original printings of Star Trek comics, tech manual, and ship blueprints is so hardcore nerdy that I feel it belongs in spirit if not specifics.

May the Fourth be with you all!