Friday, December 31, 2021

Simple(ly) Awesome Shirt to Sew

It's Free Pattern Friday time, just in time for the new year! Start 2022 off right with this quick sewing project that is very beginner friendly :)


This pattern was adapted from a version of a traditional Rumanian garment. The original was knee length with slightly narrower pleated sleeves and counted embroidery on the collar, front and sleeves.

For my version I was a bit limited by the fabric I chose, but also wanted a shorter shirt instead of a knee length tunic. I also took the taper out of the sleeves and gathered them at the cuff instead of pleating, to give a bit softer and fuller look. I took in the width of the body as well since the original size would have been enormous on me.


The fabric I chose was a thrift store tablecloth I found for 2$. It’s a lovely soft cotton in pale yellow, with beautiful hand embroidery and cutwork designs in grey. The tablecloth measured 46” by 62” with hand rolled edges.


The first step was to draft the full sized pattern pieces from my diagram. I used a 30” wide roll of white craft paper, but tissue will work fine as well. Since almost all of the pattern pieces are straight lines and rectangles, drafting them on the paper is easy. All you really need is a square ruler or yardstick. For the one curved line (the armhole) I traced the back piece from another blouse pattern. You could also use a curved ruler.

After drafting my pattern pieces on paper, I carefully laid them out on the tablecloth to ensure I had enough material and to see how best to arrange the pieces to make the most of the embroidery. As you can see from the picture of the pieces laid out, there is quite a bit of material left over. I arranged the pieces based on where I wanted the embroidery, not the most efficient use of fabric. This size tablecloth can make a larger shirt than mine easily if placement is done well.

Next came carefully cutting the pieces out. I aligned the shirt pieces so that I could use the rolled edge of the tablecloth and not have to hem up the bottom. I chose not to use interfacing in the collar and cuffs because I didn’t want it to show through the cutwork. I carefully cut the slits on the front and facing and marked the ends of the slits for the sleeves and side seams. 
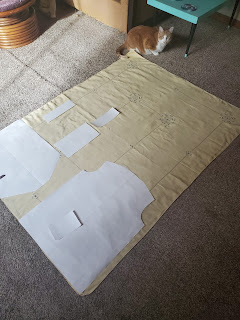
My Chief Inspection Officer diligently holding down the corner of my fabric as I lay out my pattern pieces

All the pieces cut, from left to right: Front and Back, Neck Facing, Shoulders, Collar, Cuffs, and Sleeves at top right

So after the cutting was done, sewing was next:
  1. Sew the facing to the front, turning a sharp V shape at the bottom of the slit. Clip a notch in the seam allowance at the center of that V, almost to the stitching. Turn the facing inside and press.

  2. Sew the shoulder pieces to the front, press the seams open.

  3. Sew the shoulder pieces to the back, press the seams open.

  4. Sew the side seams, leaving a 4” slit open at the bottom. Press the seams open and topstitch around the slits.

  5. Sew the two collar pieces together along the short edges and one long edge. Clip the seam allowance at the corners. Turn and press. Press under seam allowance on the inside edge of the open side.

  6. Sew the collar onto the neck edge, careful to keep the facing and front together. Press the seam allowance up into the collar. Hand stitch the inside edge of the collar in place.

  7. Sew the sleeve seams, leaving a 3” slit at the wrist. Press the seams open and topstitch around the slits.

  8. Use a basting stitch to gather the wrist to the length of the cuff.

  9. Fold each cuff in half and sew the short sides. Clip the seam allowance at the corners. Turn and press. Press under seam allowance on the inside edge of the open side.

  10. Sew the cuff to the gathered wrist edge. Press the seam allowance up into the cuff. Hand stitch the inside edge of the cuff in place.

  11. Sew the sleeve into the armhole, carefully matching the straight edge at the top of the sleeve cap with the shoulder pieces on the body. Sew another line just inside the seam allowance at the underarms to reinforce.

  12. Add buttonholes and buttons to cuffs as desired.


Notes:

 I used a ⅜” seam allowance throughout. Mostly this was to make it easier to get the embroidery where I wanted on the garment, less of it was lost into the seams.

The pattern pieces in the diagram DO NOT have seam allowance included in their measurements. This is by design, so that you can add however much seam allowance you desire. Either add it in when drafting full size, or when cutting.

I made the buttonholes on the cuffs by hand, using the embroidery as a guide. I also didn’t add buttons as I wanted to use cufflinks. This is purely personal preference.

I resized the original garment to me by measuring myself. The widest part of my body is 40” around, so the body of the shirt had to be at least that. I measured across the back of a neckband on a shirt I like and got 6”, thus the width at the center neck of the shirt became 6”. This pattern is supposed to be loose, and the armholes and shoulders are boxy and generous. Still, it would not be hard to size those up or down by adjusting the shoulder pieces and depth of the armhole curve. If you have enough fabric and want the original knee length look, go for it! Just make the shirt pieces longer. Make the cuffs wider if you want, or the collar. These pattern pieces are pretty simple, so feel free to customize them into your perfect shirt.


It looks pretty great belted too!


Thursday, December 23, 2021

Swatch it Up!

One of the many things I dabble in is designing knitting patterns. Most often I do so because I conceived of a desire for a garment and couldn't find an existing pattern that was exactly what I wanted. So I try to make my own.

Last year an off hand comment from my cousin about wanting to learn how to crochet lace so she could make a snood that fit her hair sent me on a spiral of pattern designing that still continues long past the original impetus.


She got me thinking about lace, and about how I can't crochet very well.  But I can knit with some degree of skill and I knew knit lace was a thing, so why not knitted snoods?

Patterns searches got me to one lack luster knit lace snood, and from there the fire was lit. I could take that pattern base and come up with much better lace than that.


And so began the great swatch production. Every cool new lace pattern I could find or think of got worked up into a swatch.


I did eventually make my cousin her snoods, but along the way I made a few for myself, a lace tank top, a sweater with lace panels, several Barbie dresses, and most of a lacy beaded jacket. I'm still not sure I'm done with lace just yet, there are a few more plans percolating in my brain. A patchwork piece out of all my swatches is indeed one of them!


Thursday, June 17, 2021

Nerds Shall Inherit the Earth

I shop at thrift stores a lot.  Really, a lot.  Clothes, books, decor items, cookware, raw materials for my shop; most of the goods I buy come from second hand shops.  This is partly because I am cheap and refuse to pay full price for new when perfectly serviceable things are available used.  Mostly, however, I shop at thrift stores because they can offer some hidden gems found nowhere else.

Sometimes these gems are beautiful and unique vintage clothing, or really high quality kitchenware for a bargain, and sometimes the value of a find is because it is incredibly nerdy:


R2-D2 thermos, Dr. Strange wall art, and Humphrey Bogart on a necktie; how much more cinema nerdy can you get?

Don't worry fantasy fans, I didn't forget you:


Medieval castle rubbings ready to hang in your dungeon/gaming cave, and yes that is a fully functioning water pitcher shaped like a dragon.

Friday, July 10, 2020

Best Mom's Closet Find Ever

When I was in high school my mother decided she needed to clean out her closet, and she asked if I wanted to see if there was anything of hers I wanted. Based on what I saw my mom wearing day to day, I wasn't sure I'd find anything worthy of my delicate teenaged sensibilities, but agreed to help.

Little did I know that my mom had kept nearly everything from before she and my dad had even met.  Back then it was cheaper to make clothes than buy them, and she had made nearly her entire wardrobe herself. Being a bit of a sentimentalist, she had kept most of it long after it no longer fit. So I got to take my pick of wonderfully handmade, deliciously retro 1960's and 70's vintage clothing.  I was ecstatic. Until I realized almost none of it fit.

See, I take after my grandmother shape wise, and am long legged, small chested and wide hipped.  My mom is almost the complete opposite. 

There was one pair of bright cherry red bell bottoms that I could just barely squeeze my hips into. I let out the hem as much as I could, and wore them for a few years. Then my hips filled out some more and that was that. I still have them in my closet, though I have no idea why. Like mother like daughter I guess.

The only other thing I kept from that closet cleanout was a halter top made from the absolute best fabric I have ever seen. I have kept it and hoarded it, building up my knowledge of fabric and sewing until the day I felt confident enough to try to alter it.


It's been almost 20 years since that closet cleaning. When I recently told my mom that I had dug out the halter top and was finally ready to try altering it,  she dug around in her craft room a bit and found the remnants of the original fabric.  I have never been so grateful for her hoarding tendencies. Armed with my own sewing experiences by now, and a backup stash of fabric, I got to work.


So here it is, pinned and ready for the final sewing.  I don't have a before picture, mostly because I forgot to take one.  Just imagine it sized for a much bustier figure and hanging loose on my flat chested dress form :)

Wednesday, July 8, 2020

Knitting Tricks: Knitting two Pieces Together

I am an avid and primarily self taught knitter. I learned most of the techniques I know by trial and error as I worked a pattern that was probably too advanced for me at the time. Collecting these tricks and techniques into one place is hopefully as helpful to others as it is to me.

Knitting two pieces together is very similar to the three needle bind off method, except you don't bind off.  It is a way of joining two knit pieces together, and then continuing to knit one piece from there.  

I first encountered it as a way to add layered ruffles to gauntlets, and I use it frequently in my own designs to make seamless hems and other features.  It is incredibly useful for joining parts of garments without binding off or seaming. It does only work if the two pieces have the same number of stitches, however.

Insert the right hand needle into one stitch from each left hand needle, as if to knit.  Just like you would if you were working two stitches from the same needle, knit the two stitches together and pull them off the left hand needles.


Continue working stitches this way; knitting one from each left hand needle together.  Once the row is finished, your two pieces of knitting will be joined, and you will have live stitches on your right hand needle ready to continue. 


Always Read the Fine Print

I shop at thrift stores a lot.  Really, a lot.  Clothes, books, decor items, cookware, raw materials for my shop; most of the goods I buy come from second hand shops.  This is partly because I am cheap and refuse to pay full price for new when perfectly serviceable things are available used.  Mostly, however, I shop at thrift stores because they can offer some hidden gems found nowhere else.

Sometimes these gems are beautiful and unique vintage clothing, or really high quality kitchenware for a bargain, and sometimes the value of a find is because it is a wonderful piece of written hilarity:


I found this tucked inside a box full of old recipes, half of which included jello or marshmallows. I didn't even bother looking any further through the recipes and just bought the box, giggle-snorting to myself at the phrase 'long time napkin losers'


Apologies for the bad pictures but lighting in thrift stores is not always the best. These too had me giggling helplessly in the store: "...give your entire thought to preparing him for domestication..." and "When she appears to wilt, take her out to dinner..." are my particular favorites.


Vintage Craft Book Feature: Teach Yourself to Knit the Easy Columbia Minerva Way (1968)

Another of my many needlework hobbies is the collection of vintage craft books. Found in dusty corners of second hand shops, in pride of place in used book stores, these old tomes often contain beautiful nuggets of crafting wisdom, and a heaping helping of vintage charm. Reviving the techniques, tips and retro projects is just one more way for us to bring back the wonders of the handmade.

Teach Yourself to Knit the Easy Columbia Minerva Way - 1968


Another of my bargain finds, these old yarn manufacturer's pattern books are often filled with hidden goodies.  As a beginner's book, most of the patterns in this one are pretty basic and easy to make. That said, I do really like the little bits of color and ribbing on the cover projects.

As would be expected of such and instructional book, the first few pages are wonderful illustrations of various knit stitches and and cast on methods. All of it very handy and easy to  access for the beginning knitter.  I am not a beginner, and so I almost passed this one up, even at the low price, until I started flipping through it.


Peppered throughout the instructions are these adorably snarky babies that had me giggling aloud in the store. If nothing else I will page through this booklet whenever I need a good laugh in the middle of a tough project.


Also, this halter style man's vest is probably the coolest design in the whole book.