It's Free Pattern Friday time, just in time for the new year! Start 2022 off right with this quick sewing project that is very beginner friendly :)

This pattern was adapted from a version of a traditional Rumanian garment. The original was knee length with slightly narrower pleated sleeves and counted embroidery on the collar, front and sleeves.
For my version I was a bit limited by the fabric I chose, but also wanted a shorter shirt instead of a knee length tunic. I also took the taper out of the sleeves and gathered them at the cuff instead of pleating, to give a bit softer and fuller look. I took in the width of the body as well since the original size would have been enormous on me.

The fabric I chose was a thrift store tablecloth I found for 2$. It’s a lovely soft cotton in pale yellow, with beautiful hand embroidery and cutwork designs in grey. The tablecloth measured 46” by 62” with hand rolled edges.

The first step was to draft the full sized pattern pieces from my diagram. I used a 30” wide roll of white craft paper, but tissue will work fine as well. Since almost all of the pattern pieces are straight lines and rectangles, drafting them on the paper is easy. All you really need is a square ruler or yardstick. For the one curved line (the armhole) I traced the back piece from another blouse pattern. You could also use a curved ruler.
After drafting my pattern pieces on paper, I carefully laid them out on the tablecloth to ensure I had enough material and to see how best to arrange the pieces to make the most of the embroidery. As you can see from the picture of the pieces laid out, there is quite a bit of material left over. I arranged the pieces based on where I wanted the embroidery, not the most efficient use of fabric. This size tablecloth can make a larger shirt than mine easily if placement is done well.
Next came carefully cutting the pieces out. I aligned the shirt pieces so that I could use the rolled edge of the tablecloth and not have to hem up the bottom. I chose not to use interfacing in the collar and cuffs because I didn’t want it to show through the cutwork. I carefully cut the slits on the front and facing and marked the ends of the slits for the sleeves and side seams.
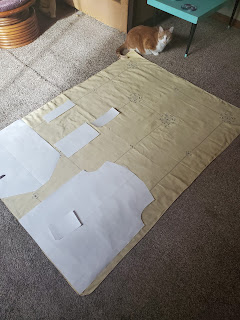 |
| My Chief Inspection Officer diligently holding down the corner of my fabric as I lay out my pattern pieces |
 |
| All the pieces cut, from left to right: Front and Back, Neck Facing, Shoulders, Collar, Cuffs, and Sleeves at top right |
So after the cutting was done, sewing was next:
Sew the facing to the front, turning a sharp V shape at the bottom of the slit. Clip a notch in the seam allowance at the center of that V, almost to the stitching. Turn the facing inside and press.
Sew the shoulder pieces to the front, press the seams open.
Sew the shoulder pieces to the back, press the seams open.
Sew the side seams, leaving a 4” slit open at the bottom. Press the seams open and topstitch around the slits.
Sew the two collar pieces together along the short edges and one long edge. Clip the seam allowance at the corners. Turn and press. Press under seam allowance on the inside edge of the open side.
Sew the collar onto the neck edge, careful to keep the facing and front together. Press the seam allowance up into the collar. Hand stitch the inside edge of the collar in place.
Sew the sleeve seams, leaving a 3” slit at the wrist. Press the seams open and topstitch around the slits.
Use a basting stitch to gather the wrist to the length of the cuff.
Fold each cuff in half and sew the short sides. Clip the seam allowance at the corners. Turn and press. Press under seam allowance on the inside edge of the open side.
Sew the cuff to the gathered wrist edge. Press the seam allowance up into the cuff. Hand stitch the inside edge of the cuff in place.
Sew the sleeve into the armhole, carefully matching the straight edge at the top of the sleeve cap with the shoulder pieces on the body. Sew another line just inside the seam allowance at the underarms to reinforce.
Add buttonholes and buttons to cuffs as desired.


Notes:
I used a ⅜” seam allowance throughout. Mostly this was to make it easier to get the embroidery where I wanted on the garment, less of it was lost into the seams.
The pattern pieces in the diagram DO NOT have seam allowance included in their measurements. This is by design, so that you can add however much seam allowance you desire. Either add it in when drafting full size, or when cutting.
I made the buttonholes on the cuffs by hand, using the embroidery as a guide. I also didn’t add buttons as I wanted to use cufflinks. This is purely personal preference.
I resized the original garment to me by measuring myself. The widest part of my body is 40” around, so the body of the shirt had to be at least that. I measured across the back of a neckband on a shirt I like and got 6”, thus the width at the center neck of the shirt became 6”. This pattern is supposed to be loose, and the armholes and shoulders are boxy and generous. Still, it would not be hard to size those up or down by adjusting the shoulder pieces and depth of the armhole curve. If you have enough fabric and want the original knee length look, go for it! Just make the shirt pieces longer. Make the cuffs wider if you want, or the collar. These pattern pieces are pretty simple, so feel free to customize them into your perfect shirt.
 |
| It looks pretty great belted too! |


